Your director keeps calling you out during block. Your lower back aches after every rehearsal. Your shoulders feel like they’re carrying the weight of the entire brass section.
Poor marching posture isn’t just uncomfortable. It affects your sound, your endurance, and your ability to execute drill cleanly. The good news? Most posture problems stem from three fixable habits that you can correct before your next performance.
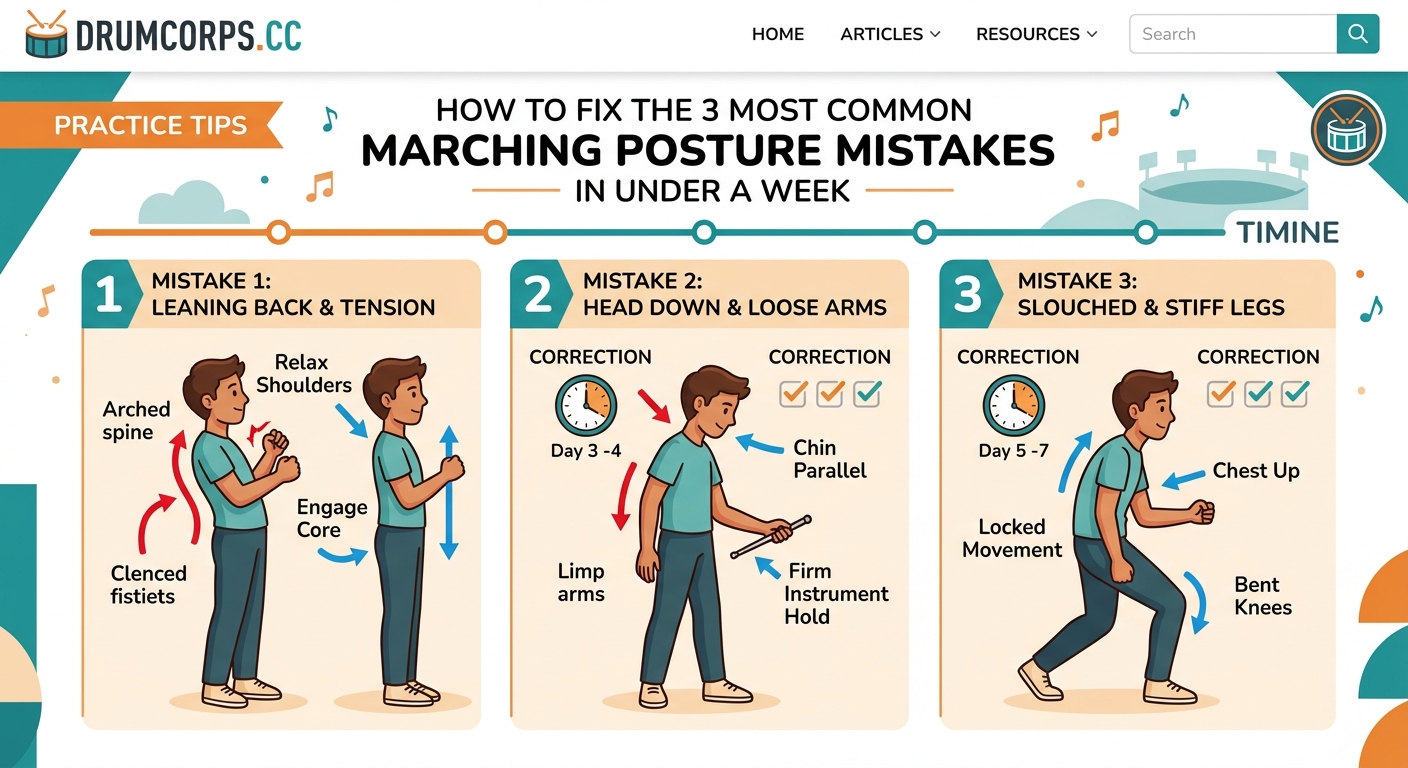
Fixing marching band posture requires addressing three core issues: collapsed chest position, locked knees, and forward head tilt. By practicing proper alignment drills for just 10 minutes daily and applying body awareness during rehearsals, you can eliminate discomfort and improve your performance within a week. The key is building muscle memory through consistent, focused practice rather than trying to force perfect posture all at once.
Understanding Why Your Posture Breaks Down
Most marching band members start rehearsal with decent posture. Then fatigue sets in.
Your body compensates. Your chest caves inward to reduce the strain of holding your instrument. Your knees lock to give your legs a rest. Your head drifts forward as you try to see your drill coordinates.
These compensations feel easier in the moment. But they create a cascade of problems. Collapsed posture restricts your breathing, which matters whether you’re playing a mellophone or carrying a snare drum. Locked knees cut off circulation and make you more likely to pass out during long sets. Forward head position throws off your entire spinal alignment.
The solution isn’t to muscle through with rigid, military-style posture. That creates just as much tension and fatigue. Instead, you need to build sustainable alignment that your body can maintain for an entire show.
The Three Posture Mistakes Killing Your Performance
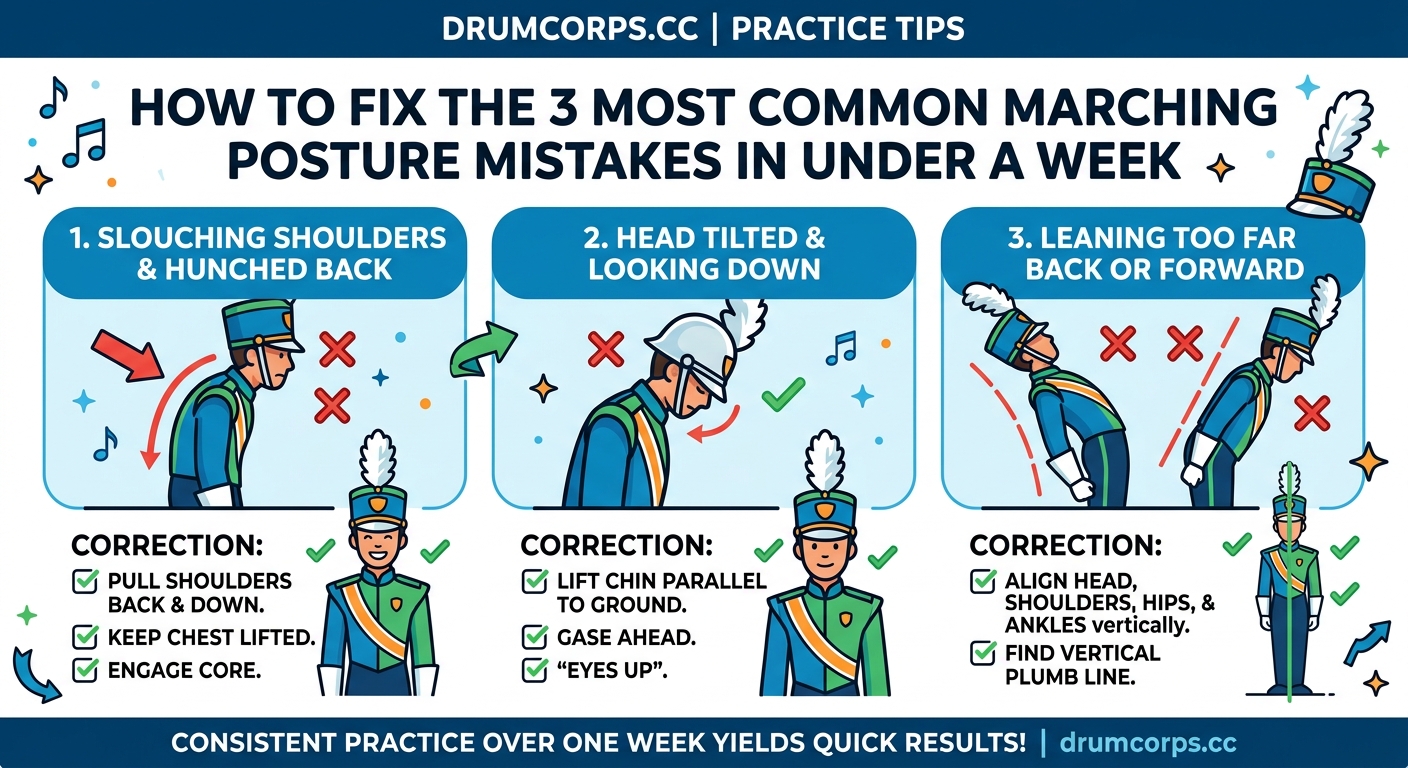
Let’s break down exactly what’s going wrong and why it matters.
| Mistake | What It Looks Like | Why It Hurts You |
|---|---|---|
| Collapsed Chest | Shoulders round forward, ribcage sinks | Restricts breathing, weakens sound production, causes upper back pain |
| Locked Knees | Legs straight and rigid, no flex in joints | Cuts circulation, increases fall risk, creates lower back strain |
| Forward Head | Chin juts out, ears ahead of shoulders | Neck tension, headaches, disrupts balance during drill |
Each of these mistakes feeds into the others. When your chest collapses, your head naturally drifts forward to compensate. When your knees lock, your pelvis tilts and your chest has to work harder to stay upright.
Breaking this cycle requires addressing all three issues together, not just fixing one at a time.
Building Your Foundation from the Ground Up
Start with your feet. This sounds basic, but foot position determines everything above it.
Stand with your feet hip-width apart. Not shoulder-width. Hip-width. You should be able to draw a straight line from your hip joint down through your ankle. This creates a stable base without forcing your legs too wide.
Now check your weight distribution. Rock forward onto your toes, then back onto your heels. Find the middle point where your weight sits evenly across your entire foot. This is your neutral position.
Keep a soft bend in your knees. Not a squat. Just enough flex that you could bounce slightly without adjusting your leg position. This micro-bend keeps blood flowing and prevents the locked-knee trap that sends so many people to the ground during long rehearsals.
Your pelvis should sit neutral, not tucked under or arched forward. Imagine a bowl of water balanced on your hips. Tipping it forward or backward spills the water. Find the position where the bowl stays level.
Fixing Your Upper Body Alignment
Your ribcage should stack directly over your pelvis. Not thrust forward. Not sinking backward.
Here’s a drill that makes this click: Place one hand on your sternum and one on your lower belly. Breathe in and feel your ribcage expand upward and outward. As you exhale, maintain that lifted position. Your chest shouldn’t collapse when you breathe out.
Practice this for 30 seconds at a time. The goal is to feel your ribcage floating above your hips, supported by your core muscles rather than locked in place by tension.
Your shoulders need special attention because they carry your instrument weight. Roll them up toward your ears, then back, then down. This is the position you want. Shoulders back and down, but not squeezed together. There should be space between your shoulder blades.
Many brass players overdo the “shoulders back” cue and end up with their shoulder blades pinched together. This creates just as much tension as rounded shoulders. Think about sliding your shoulder blades down your back toward your hips instead of squeezing them together.
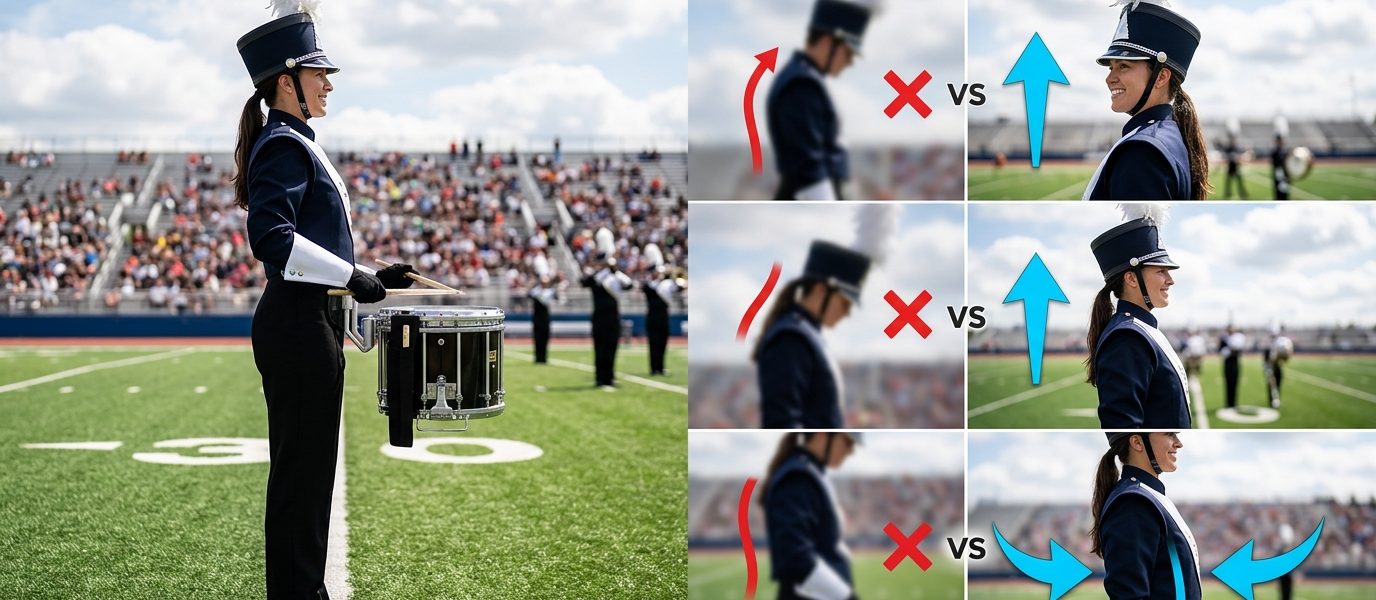
Solving the Forward Head Problem
Your head weighs about 10 to 12 pounds. For every inch your head moves forward from neutral, it adds 10 pounds of strain on your neck muscles.
Find neutral by standing against a wall. Your heels, butt, shoulder blades, and the back of your head should all touch the wall. This feels weird at first. Your chin might feel tucked. That’s because you’ve been living with forward head posture for so long that neutral feels unnatural.
Step away from the wall and try to maintain that alignment. Think about lengthening the back of your neck rather than pulling your chin back. Imagine a string attached to the crown of your head, gently lifting you taller.
This position should feel effortless once you find it. If you’re straining to hold your head back, you’ve overcorrected.
Daily Drills That Rewire Your Muscle Memory
Knowing correct posture and maintaining it during a two-hour rehearsal are different skills. You need to build the muscle memory and endurance to hold proper alignment under fatigue.
Here’s a 10-minute daily routine that builds sustainable posture:
-
Wall angels (2 minutes): Stand against a wall in neutral alignment. Raise your arms into a goalpost position, then slide them up overhead and back down. Keep your ribs, head, and arms touching the wall throughout the movement. This strengthens the muscles that hold your shoulders back and down.
-
Core breathing (3 minutes): Lie on your back with knees bent. Place a light book on your belly. Breathe in through your nose for 4 counts, feeling the book rise. Exhale for 6 counts, maintaining your ribcage position. This teaches you to breathe without collapsing your chest.
-
Standing balance holds (2 minutes): Stand on one foot with proper alignment. Hold for 30 seconds, then switch. This builds the stability muscles that keep you aligned during drill.
-
Instrument holds (3 minutes): Hold your instrument in playing position with perfect posture for 30 seconds. Rest for 30 seconds. Repeat 3 times. This builds the specific endurance you need for performance.
Run through this sequence every morning. The time investment is minimal but the payoff is huge.
Applying Posture Fixes During Rehearsal
Knowing what to do and doing it under pressure are different challenges. Here’s how to maintain your posture work when you’re actually marching.
Set micro-checkpoints throughout your show. Pick three moments in your drill where you’ll do a full-body scan. Maybe it’s during a sustained note, a hold, or a visual moment. Use those checkpoints to reset your alignment if it’s drifted.
Film yourself during rehearsal. Your phone propped on a stand works fine. Watch the footage and compare your posture at the start of a run versus the end. You’ll spot exactly when and how your alignment breaks down.
Work with a section buddy who can give you real-time feedback. They watch you during a run and note specific moments when your posture collapses. This external observation catches things you can’t feel yourself.
“The best marchers aren’t the ones with perfect posture at the start of rehearsal. They’re the ones who can recognize when their alignment drifts and reset it in the middle of a phrase without disrupting their performance.”
This skill separates good marchers from great ones.
Addressing Pain and Discomfort
Some discomfort during the adjustment period is normal. Your muscles are learning new patterns. But pain is a warning sign.
Lower back pain often means your core isn’t supporting your posture. Your back muscles are doing all the work. Add planks and dead bugs to your daily routine to build core strength.
Neck pain usually points to forward head position that hasn’t fully corrected. Go back to the wall drill and reset your head position multiple times throughout the day.
Shoulder pain might mean you’re overworking the “shoulders back” cue. Let your shoulders relax down rather than pulling them into position.
If pain persists beyond a week or gets worse instead of better, talk to your director and consider seeing a physical therapist. Pushing through serious pain leads to injury, not improvement.
Connecting Posture to Sound Quality
Better posture directly improves your sound, whether you’re in the horn line or the battery.
For brass and woodwind players, proper alignment opens your airway. A collapsed chest compresses your lungs and restricts your air column. Standing tall gives you access to your full breath capacity, which means better tone, better endurance, and better control. The same breathing principles that support how to build rock-solid breath support for high brass endurance start with proper posture.
For percussion, alignment affects your stick height, timing, and power. When your head drifts forward, your arms have to work harder to maintain playing position. When your shoulders round, your stick angles change and you’re more likely to get rim clicks instead of clean center hits.
Even color guard members benefit from proper posture. Alignment affects your balance during spins, your extension during tosses, and your overall visual impact.
Making Posture Automatic
The goal isn’t to think about your posture constantly during performance. That’s exhausting and distracts from your actual job of playing and marching.
The goal is to build such strong muscle memory that good posture becomes your default. You return to proper alignment automatically, even when you’re focused on hitting a difficult passage or nailing a tricky drill move.
This takes time. Most people need about three weeks of consistent practice before new posture patterns feel natural. Give yourself that time.
Track your progress by noting how long you can maintain proper alignment without conscious thought. Start with 30 seconds. Build to a minute. Then five minutes. Eventually, you’ll make it through entire sections of your show without your posture breaking down.
Integrate your posture work with other fundamentals. When you’re working on how to fix your backward marching before your next competition, maintain the same alignment principles. When you’re running through how to build a perfect 30-minute individual practice routine, include posture drills as part of your warmup.
Common Questions About Posture Correction
How long before I see improvement?
Most people notice reduced discomfort within three to four days of consistent practice. Visual improvement in your alignment shows up within a week. Full habit change takes about three weeks.
Can I fix my posture if I have scoliosis or other conditions?
Modified posture work can help, but consult with a healthcare provider first. They can identify which adjustments are safe and beneficial for your specific situation.
Should my posture feel natural or forced?
Proper posture should feel effortless once you find it. If you’re straining to hold position, something is off. You might be overcorrecting or missing a key alignment piece.
What if my instrument makes proper posture impossible?
Some instruments create unique challenges. Sousaphone players carry asymmetric weight. Snare drummers deal with harness pressure. The principles stay the same, but you might need instrument-specific modifications. Talk to your tech or caption head about adjustments that work with your equipment.
Posture Fixes That Stick
The difference between knowing how to fix your posture and actually fixing it comes down to consistent practice and body awareness.
Run through your daily drills. Set your rehearsal checkpoints. Film yourself regularly. Work with your section buddy. Give your body the three weeks it needs to rewire its default patterns.
Your back will stop aching. Your sound will improve. Your director will stop calling you out during block. And you’ll have the physical foundation to perform at your best from the opening note to the final pose.
Start with today’s rehearsal. Pick one element to focus on. Maybe it’s keeping your knees soft. Maybe it’s maintaining your ribcage position during a long phrase. Master that one piece, then add the next.
Your body is capable of sustainable, powerful posture. You just need to give it the right training and enough time to adapt. The work you put in this week will pay off in every rehearsal, every performance, and every season for the rest of your marching career.