Choosing the right marching tenor drums can make or break your performance season. The wrong setup leads to fatigue, inconsistent sound, and frustration during long rehearsals. The right one feels like an extension of your body and lets you focus on musicality instead of fighting your equipment.
Selecting marching tenor drums requires matching drum configuration to your skill level, evaluating shell material for tone and weight balance, testing carrier ergonomics for comfort during long performances, and choosing a tuning system that maintains pitch stability. Your decision should prioritize physical fit and musical goals over brand loyalty or aesthetic preferences alone.
Understanding Tenor Drum Configurations
Tenor drums come in several configurations, and each serves different musical and physical demands.
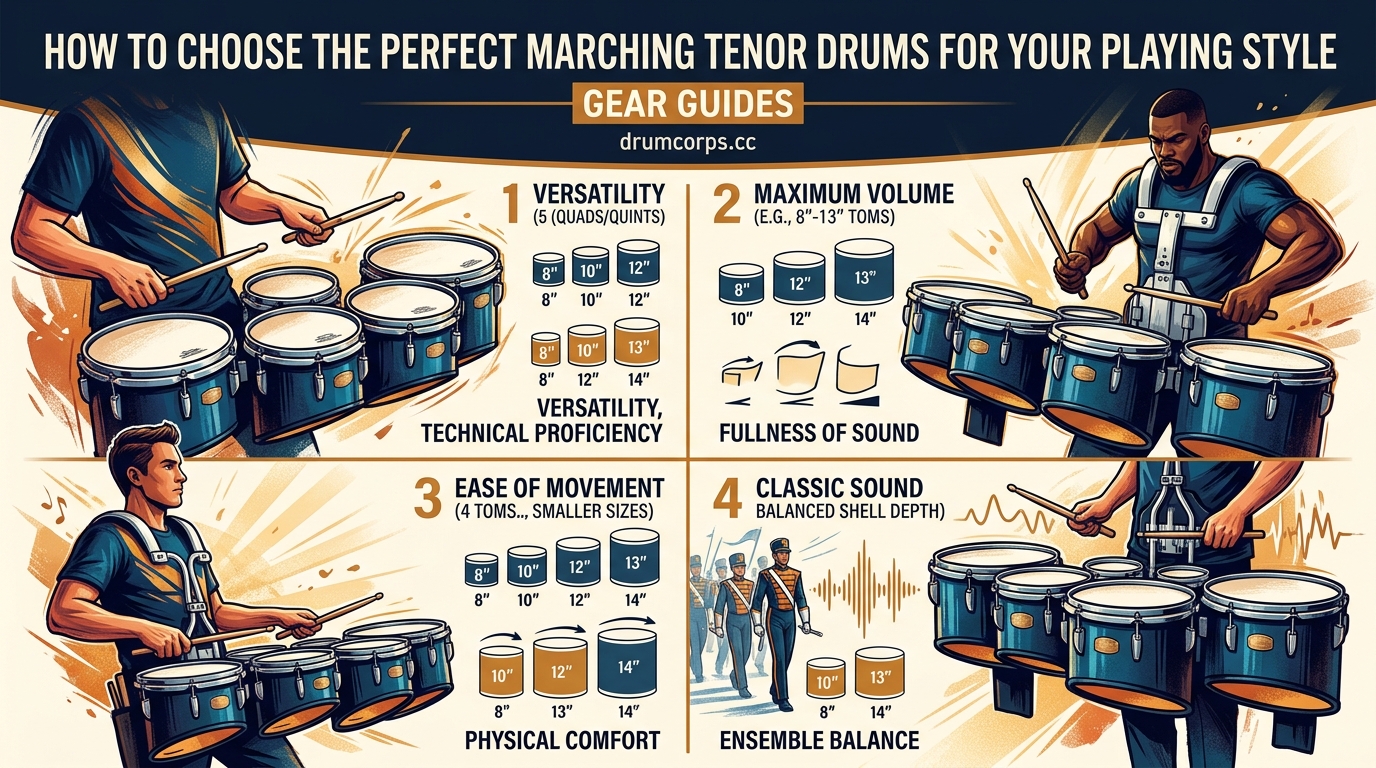
Tri-toms feature three drums and work well for younger or smaller players. They weigh less and require less reach across the playing surface. Many middle school programs start students on this setup before moving to larger configurations.
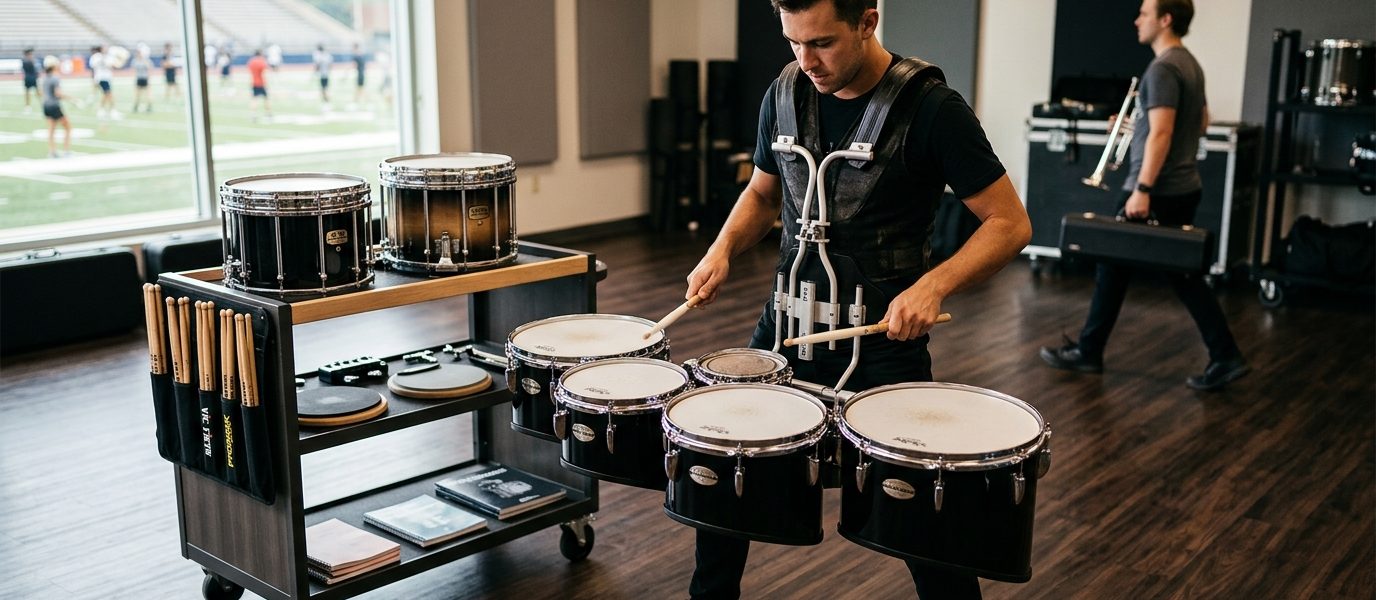
Quads use four drums and represent the standard for most high school and college programs. This configuration offers enough tonal range for complex parts without overwhelming newer players. You get low, mid-low, mid-high, and high drums that cover most musical needs.
Quints add a fifth drum, typically a spock drum mounted in the center. This setup appears in competitive drum corps and advanced high school lines. The extra drum provides more tonal colors but demands greater physical stamina and technical precision.
Sextets include six drums and show up primarily in world-class drum corps. These setups require exceptional strength and coordination. Most players need several seasons of experience before handling this configuration effectively.
Your physical build matters more than your ambition here. A smaller player struggling with quints will sound worse than the same player executing cleanly on quads. Start with what you can control and upgrade as your strength develops.
Shell Material and Sound Characteristics

The shell material affects both tone quality and overall weight.
Aluminum shells produce bright, cutting tones that project well in outdoor settings. They weigh less than other materials, making them popular for younger players or those concerned about endurance. The sound can feel harsh in indoor venues but shines on football fields and competition lots.
Maple shells deliver warm, resonant tones with more depth than aluminum. They cost more and weigh more but offer superior musicality for indoor performances and recordings. Many college programs prefer maple for concert settings while using aluminum for marching season.
Hybrid shells combine materials to balance weight and tone. Some manufacturers use aluminum with reinforcement rings or maple with lightweight cores. These designs attempt to give you the best of both worlds but often come at premium prices.
Kevlar shells appear in some high-end models. They offer extreme durability and consistent tone across temperature changes. The weight falls between aluminum and maple, and the price usually exceeds both.
Consider where you perform most often. Outdoor programs benefit from aluminum’s projection. Indoor groups might justify the investment in maple. Budget-conscious buyers should prioritize aluminum quads from reputable manufacturers over expensive exotic materials.
Carrier Systems and Physical Fit
The carrier determines how weight distributes across your body during performance.
Modern carriers use padded shoulder rails, chest plates, and back supports. Poor carrier design causes shoulder pain, back strain, and restricted breathing. Even the best drums sound terrible when you’re in pain.
Test carriers with the drums mounted and weighted. Walk around. March backward. Simulate playing positions. The weight should feel balanced between your shoulders and hips, not concentrated on your collarbone or lower back.
Adjustability matters more than initial comfort. Your body changes through a season. You’ll wear different uniform layers between summer rehearsals and fall performances. The carrier needs multiple adjustment points for shoulder width, chest depth, and overall height.
Padding quality varies dramatically between budget and premium carriers. Cheap foam compresses after a few weeks and never recovers. High-density padding maintains support through entire seasons. Press hard on the padding during testing. If it bottoms out easily, it won’t last.
Weight distribution should allow you to stand upright without leaning forward or backward. Some carriers place too much weight on the front, forcing you into a hunched posture that restricts breathing and creates back pain.
Building a consistent practice routine helps you adapt to new equipment faster, but no amount of practice fixes a poorly fitted carrier.
Tuning Systems and Maintenance
Tuning systems fall into two categories: tension rods and key-based systems.
Tension rod systems use individual lugs around each drumhead, similar to concert toms. They offer precise tuning control and allow you to adjust each drum independently. The downside involves more time spent tuning and more points of potential failure. These systems work best for programs with dedicated percussion staff who maintain equipment regularly.
Key-based systems use a central mechanism to adjust all tension points simultaneously. They speed up tuning and reduce the chance of uneven head tension. Some players find them less precise for fine-tuning, but modern designs have improved significantly.
Both systems require regular maintenance. Check tension before every rehearsal. Temperature changes affect tuning, especially when moving between air-conditioned rooms and hot parking lots. Bring your tuning key to every practice.
Head selection impacts your tuning stability. Thicker heads hold pitch better but reduce sensitivity. Thinner heads respond to lighter touches but go out of tune faster. Most programs use medium-weight heads as a compromise.
Evaluating Sound Quality and Projection
Sound quality depends on multiple factors working together.
Play the drums before buying whenever possible. Bring your own sticks. Play at different dynamic levels. Listen for clear attack, consistent tone across all drums, and adequate sustain without excessive ringing.
Tone matching between drums matters more than individual drum quality. The set should sound like a cohesive instrument, not four or five separate drums. Listen for smooth transitions when playing runs across the drums.
Projection determines whether your sound reaches the press box or gets lost in the ensemble. Aluminum shells generally project better than maple in outdoor settings. Deeper shells produce more volume but feel heavier and require more reach.
Overtone control separates good drums from great ones. Excessive ringing muddies fast passages and creates tuning problems. Quality drums produce clear fundamental tones without harsh overtones. Some manufacturers include internal dampening systems to control ring.
Record yourself playing different sets if possible. Recordings reveal tone qualities you might miss while playing. What feels good under your hands might not translate to the audience experience.
Step-by-Step Selection Process
Follow this process to narrow your options systematically.
-
Determine your skill level and physical capabilities. Be honest about your current strength and reach. Choose a configuration you can control cleanly rather than one you aspire to play someday.
-
Set a realistic budget including all accessories. Remember to account for sticks, a practice pad, a carrier, cases, and maintenance supplies. The drums represent only part of the total investment.
-
Research manufacturers with strong reputations in your price range. Read reviews from actual users, not just marketing materials. Ask your instructor or local percussion specialists for recommendations.
-
Test multiple sets in person if possible. Bring a friend who plays percussion to provide objective feedback. Play the same exercise on each set to make direct comparisons.
-
Evaluate carrier fit and adjustability thoroughly. Spend at least 10 minutes wearing each carrier with drums mounted. Walk around. Bend. Twist. Make sure nothing pinches or digs into your body.
-
Consider long-term maintenance and part availability. Some manufacturers offer better warranty support and easier access to replacement parts. A slightly more expensive drum with better support often costs less over time.
-
Make your decision based on fit and function, not appearance. Flashy finishes don’t improve sound quality. Focus on how the drums feel and sound, not how they look.
Common Mistakes and How to Avoid Them
| Mistake | Why It Happens | Better Approach |
|---|---|---|
| Buying based on brand prestige alone | Wanting the same drums as famous corps | Test multiple brands and choose based on personal fit |
| Choosing too many drums too soon | Overestimating current abilities | Start with quads and upgrade after mastering fundamentals |
| Ignoring carrier comfort during testing | Focusing only on drum sound | Spend equal time evaluating carrier as drums |
| Skipping the practice pad | Assuming drums alone are sufficient | Budget for a quality pad matching your drum configuration |
| Buying the cheapest option available | Tight budget constraints | Save longer for mid-range quality rather than replacing cheap drums quickly |
Many players make the mistake of prioritizing drum sound over carrier comfort. You’ll spend far more time wearing the drums than actively playing them during performances. A slightly less impressive tone with a comfortable carrier beats amazing drums that hurt after 20 minutes.
Matching Drums to Your Musical Context
Different performance settings demand different equipment choices.
Indoor percussion ensembles benefit from maple shells and deeper drums. The controlled acoustic environment allows for more nuanced tone colors. You can use thinner heads for greater sensitivity since you’re not fighting wind and outdoor ambience.
Outdoor marching bands need projection above all else. Aluminum shells with medium to shallow depths cut through brass sections and amplification systems. Durability matters more here since equipment faces weather exposure and frequent transport.
Drum corps require the highest level of everything. Most corps use quints or sextets with premium shells, advanced carriers, and professional-grade heads. The physical demands of an entire summer season eliminate any equipment that can’t handle constant use.
Parade units prioritize lightweight setups. You’ll march longer distances at parade tempo, often in extreme heat. Tri-toms or lightweight quads make more sense than impressive but exhausting larger configurations.
Your context determines your priorities. A high school marching band member needs different equipment than someone auditioning for a world-class drum corps. Match your purchase to your actual performance demands, not idealized scenarios.
“The best tenor drums are the ones that disappear during performance. You shouldn’t think about your equipment when you’re playing. If the drums fit properly and sound consistent, your brain can focus entirely on musicality and execution.” — Advice commonly shared by percussion instructors
Budget Considerations and Value Optimization
Tenor drums represent a significant investment, but smart shopping stretches your budget.
New drums from major manufacturers typically cost between $1,200 and $3,500 for a complete quad setup with carrier. Premium materials, advanced tuning systems, and brand reputation push prices toward the higher end. Entry-level models from the same manufacturers offer 80% of the performance at 60% of the cost.
Used drums provide excellent value if you know what to inspect. Check for cracks in shells, stripped tension rods, worn carrier padding, and uneven bearing edges. Used drums from quality manufacturers often outperform new drums from budget brands. Many high school programs sell equipment when upgrading, offering well-maintained drums at substantial discounts.
Package deals sometimes include drums, carrier, sticks, and cases for less than buying components separately. Evaluate whether you actually need everything in the package. Sometimes buying drums and carrier separately while skipping unnecessary accessories saves money.
Financing options exist through some retailers, but be cautious about interest rates. Saving for another month or two beats paying 20% interest over a year.
Consider cost per use rather than absolute price. Drums that last five years of heavy use cost less per performance than cheap drums requiring replacement after one season. Quality equipment maintains resale value better too.
Breaking In New Drums and Initial Setup
New drums need proper setup before they reach peak performance.
Start by checking all tension rods for even tightness. Manufacturers sometimes ship drums with uneven tension to prevent head damage during transport. Use a drum key to ensure each rod turns with similar resistance.
Play the drums for several hours before making final tuning decisions. Heads settle and stretch during initial use. What sounds perfect out of the box might sound flat after the first rehearsal. Plan to retune after your first few practice sessions.
Adjust your carrier incrementally. Make small changes and test them during actual playing, not just standing still. Your ideal setup reveals itself through use, not immediate intuition.
Mark your preferred settings with tape or permanent marker once you find comfortable positions. This helps you return to optimal setup after adjusting for different uniform layers or sharing equipment.
Clean techniques matter from day one. Developing good articulation habits on new equipment prevents bad patterns from becoming ingrained.
Accessories That Actually Matter
Some accessories improve your experience significantly while others waste money.
A quality practice pad matching your drum configuration is essential. Pads let you develop technique without disturbing neighbors or wearing out expensive heads. Look for pads with realistic rebound and similar spacing to your drums.
Stick bags that attach to your carrier keep extra sticks accessible during rehearsals and performances. Dropped sticks happen. Having immediate replacements prevents disrupting ensemble rehearsals.
Drum cases protect your investment during transport and storage. Hard cases offer maximum protection but cost more and weigh more. Soft cases work fine if you transport carefully and don’t stack heavy items on top.
Replacement heads should be purchased before you need them. Heads break at inconvenient times. Having spares prevents missing rehearsals while waiting for shipping.
Tuning apps help you achieve consistent pitch across drums. Many free apps provide accurate pitch detection. Some players prefer traditional tuning by ear, but apps help beginners develop their ears while maintaining consistency.
Skip decorative accessories until you’ve mastered fundamentals. Fancy stick tape and custom carrier padding don’t improve your playing. Focus budget on equipment that affects sound and comfort.
When to Upgrade Your Equipment
Knowing when to upgrade saves money and improves performance.
Skill progression sometimes demands equipment changes. A player who mastered quads might benefit from moving to quints. The upgrade should follow demonstrated technical control, not arbitrary timelines.
Physical growth requires carrier adjustments or replacement. Teenagers often outgrow carriers before drums wear out. Many manufacturers sell carriers separately, allowing you to keep drums while upgrading the harness system.
Changing performance contexts justify equipment changes. Moving from high school marching band to college indoor percussion might warrant switching from aluminum to maple shells.
Equipment failure forces upgrades. Cracked shells, stripped lugs, or broken carriers can’t be ignored. Sometimes repair costs approach replacement costs, making upgrades the logical choice.
Sound inconsistency that can’t be fixed through tuning or head replacement indicates underlying equipment problems. If you’ve tried multiple head combinations and tuning approaches without achieving consistent tone, the drums themselves might be the issue.
Don’t upgrade just because someone else has newer equipment. Upgrade when your current setup limits your performance or no longer fits your body properly.
Finding the Right Drums for Your Journey
Choosing marching tenor drums combines practical assessment with personal preference. The best drums fit your body comfortably, match your current skill level, suit your performance context, and fall within your budget.
Test equipment thoroughly before buying. Talk to experienced players and instructors. Consider long-term value over short-term savings. Remember that equipment serves your musicality rather than defining it.
Your first set of tenor drums probably won’t be your last. Players grow, skills develop, and contexts change. Choose equipment that supports your current needs while allowing room for growth. The right drums help you focus on making music instead of fighting your gear.
Start your search with clear priorities. Know your budget. Understand your physical requirements. Be honest about your skill level. Then test everything you can get your hands on. The right drums will feel obvious once you find them.